My SFF NAS Setup of 2023
Table of Contents

I love building PCs. I love watching people build PCs. In 2020, I made an SFF (Small Form Factor) gaming rig. SFF machines are fantastic. They take up less space, use less power, generate less heat, and are often more portable than larger computers, making them an excellent choice for places where space is limited or for people who are always on the go.
For a while now, I’ve wanted to build a “home data center.” for stashing photos, documents, and for running a few services all the time.
My initial plan was to re-use an old machine I had lying around; this works well. However, once I discovered that you can build a NAS system in SFF, an itch to build a new PC returned, and I had to do something about it.
The whole endeavor has been quite fruitful. Not only do I have ample redundant storage, but I also have a decent amount of computing power to run several functional, convenient services all the time.
In this post, I will focus on the hardware + operating system choices, the reasons for those choices, and my observations on the outcomes. In subsequent posts, I will cover services I run on the system.
PC Components #
The list of components is available here .
The Case #
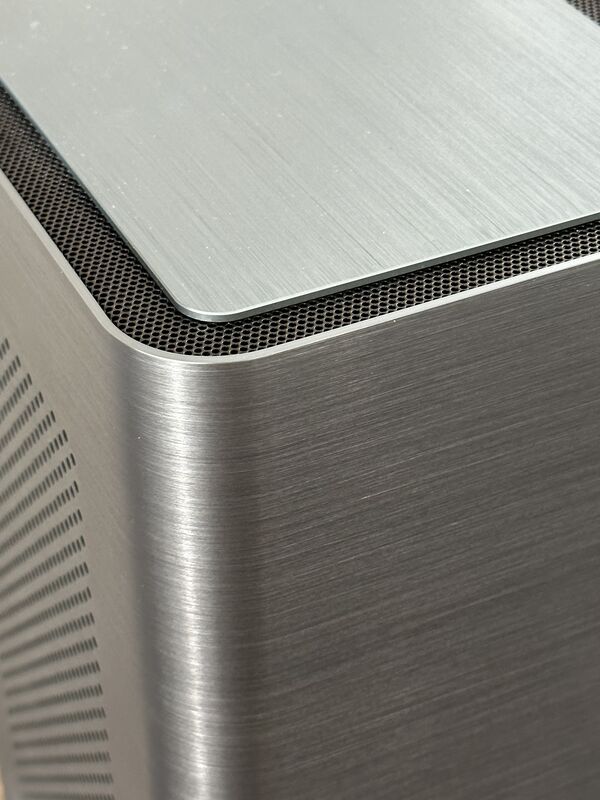
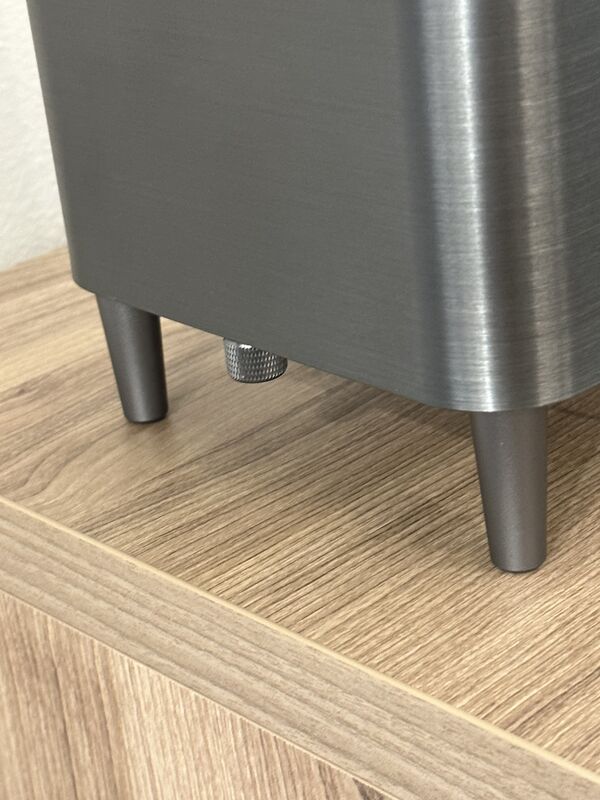
The build is centered around the Jonsbo N1 Mini-ITX NAS case . This case is beautiful! It has a superb brushed aluminum finish that looks good even in your living room. You can keep it horizontally on one side, or it has feet to keep it upright vertically.
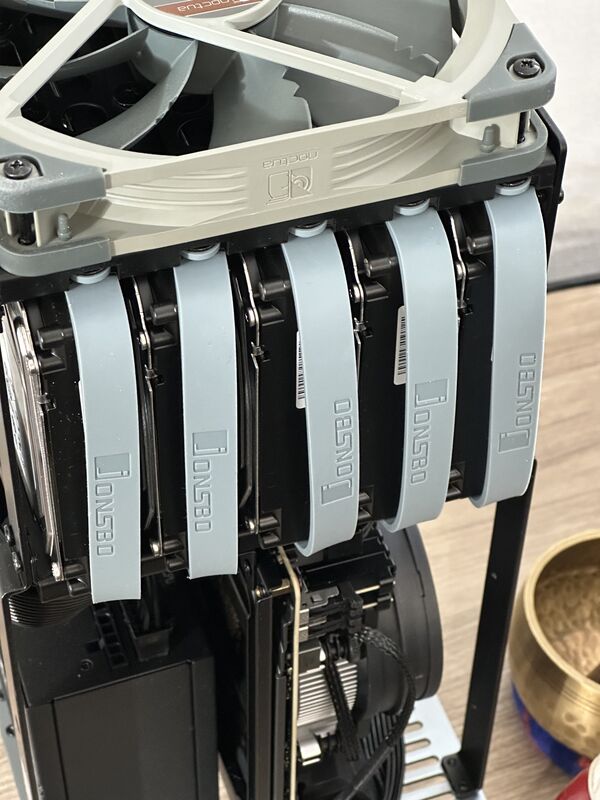
The hard-disk caddy system is a nice touch. It allows for easy replacement of drives, should the need arise.
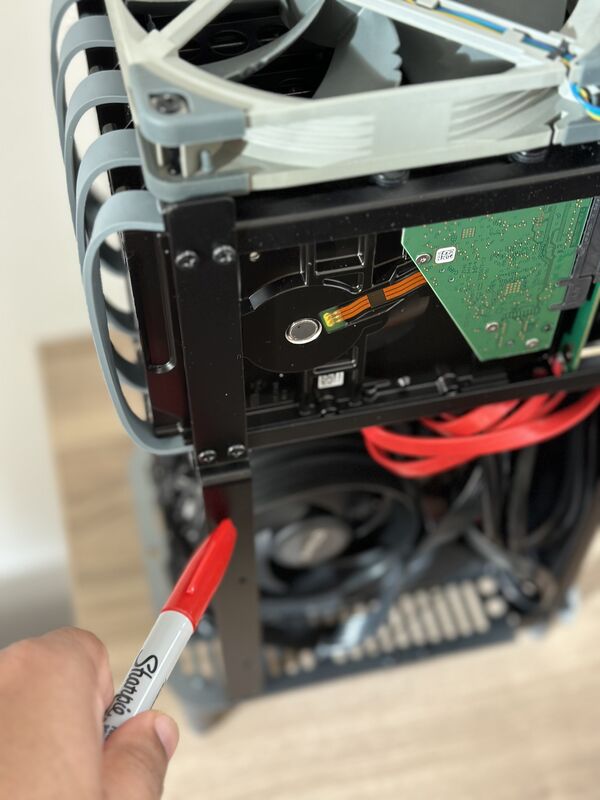
The only downside is the quality of the SATA backplane. It’s very flimsy. Maneuvering SATA cables in such a compact chassis puts abnormal shear on the ports and can cause them to break. Crazily enough, Jonsbo doesn’t cover the SATA backplane by warranty: so if you’re not careful, you will be stuck.
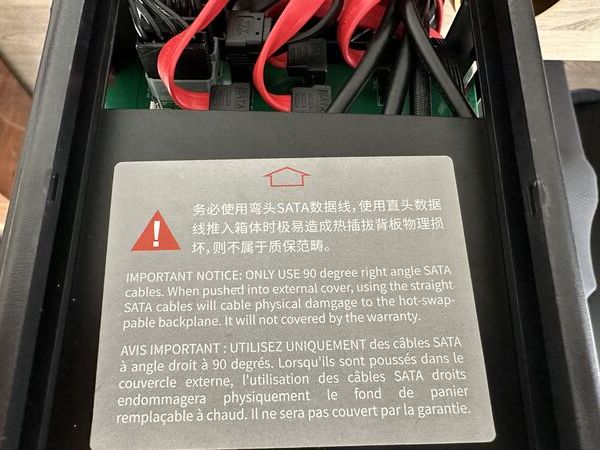
You absolutely need right-angled SATA connectors . Also, shorter cables will be easier to manage, especially if you’re going to use all the drive bays in the case; the ones linked earlier are 0.2m each. If you use long cables, you’ll look for a place to stuff all that unused wire length, affecting the cooling performance.
The case also came with an angled power cable extension. The feet are high enough that you do not need angled RJ-45 cables. If you still feel like angled RJ-45 cables will be worthwhile, there are a couple you could consider depending on the desired orientation: right-angled, rightward , or right-angle, leftward . Note: TrueNAS, which I will get to in a moment, doesn’t support WiFi. A wired connection is more sensible for a NAS system.
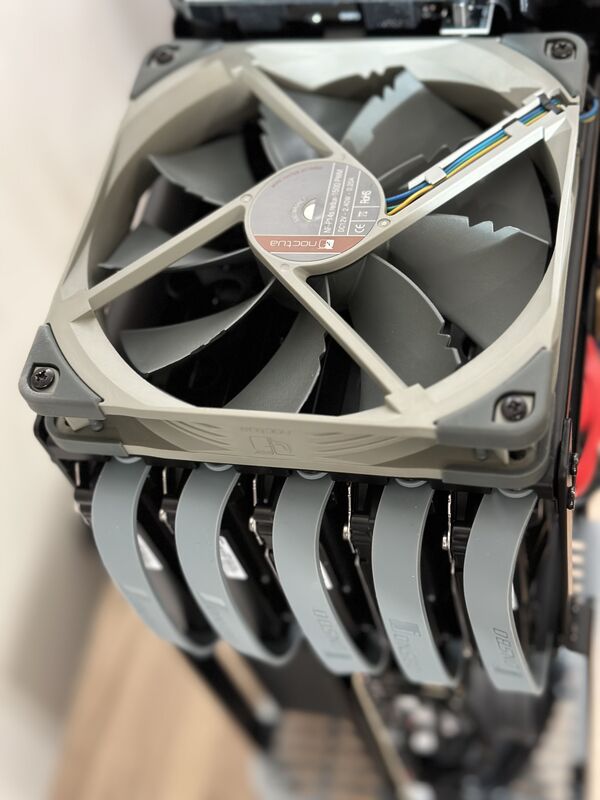
The case comes with a 140mm fan. I usually prefer to replace pre-installed case fans with ones made by Noctua, so I got a Noctua 140mm fan and anti-vibration pads (weirdly, these are sold separately). The Jonsbo N1 fan looked solid. I can’t speak for the performance, but I’d suggest giving them a try first. Additionally, I flipped the fan direction to exhaust air upwards to take advantage of the tendency of hot air to rise, given my choice of standing the case vertically. The SATA backplane has a fan header, but I chose to connect the fan directly to the motherboard to retain control of the fan speed curves in BIOS.
Tip: One of the “beams” of the case can be opened by removing the screws. This gives some much-needed breathing room during assembly and wire routing.
The Processor #
I went with the Ryzen 5 5600G APU . It was cheap (~$109 during Thanksgiving). Typically, NAS setups do not need a tonne of computing power. The onboard graphics capability eliminates the need for a discrete graphics card. Most of the time, a NAS machine isn’t connected to a monitor, but graphics capability can rescue you during a troubleshooting event, so it is worth it. I haven’t tried video transcoding tasks, but I’ve seen people post success with Jellyfin. I plan to do this eventually and share how it goes.
Since I built the machine, AMD has announced new 7000 series CPUs. There are a couple of compelling reasons to consider these CPUs. Firstly, these are more future-proof than my choice since they will use the newer AM5 socket. Secondly, the performance is highly competitive for a low power draw, which is ideal for SFF builds. You will also get access to DDR5 memory.
Cooling #
The CPU includes an AMD Wraith Stealth Cooler in the package. I’m observing high temperatures at 100% load (~95C). Improper contact with the thermal compound is a possible reason. I plan to test this theory and upgrade to something from Noctua if it is a problem. Stock coolers get a bad rap, probably for a good reason.
During idle, the temperature is at 35C, which is reasonable.
The shroud around the cooler can be pried off. I did that to give the case some breathing room.
Motherboard #
I went with the Gigabyte B550i AORUS PRO AX Mini ITX AM4 motherboard. The onboard 2.5G ethernet connectivity is desirable.
The N1 case supports 5x 3.5in and 1x 2.5in disks. The motherboard only has 4 SATA ports, so you need expansion. Two NVMe 2280 ports, one on the back and one on the front, are also available. You can install an M.2 to SATA III expansion card on the one in the front. The one in the back doesn’t have enough clearance against the mid-plate of the case, but it can be used for the boot drive for the system. To fit the larger 2280 port on the motherboard, you must buy an extender to extend from 2242 to 2280. You now have 6 SATA ports.
Other products I bought that you do not need:
- 5 Port SATA Extension - It didn’t work for me for some reason.
- PCI-e SATA Expansion Card - Not enough clearance for the SATA connector.
Warning About Required BIOS Update #
If you notice the PCPartPicker link above, it shows a warning that a BIOS update may be needed.
The Gigabyte B550I AORUS PRO AX Mini ITX AM4 Motherboard supports the AMD Ryzen 5 5600G 3.9 GHz 6-Core Processor with BIOS version F13. If the motherboard is using an older BIOS version, upgrading the BIOS will be necessary to support the CPU.
![]()
My motherboard was manufactured recently and carried an “AMD Ryzen 5000 Desktop Ready” badge on the box. In this case, no update is necessary. If you need to perform the upgrade, it’s easy .
RAM #
I went with the Corsair Vengeance LPX 32GB (2x16GB) 2133MHz . So far, it’s been plenty, and I am running several services simultaneously. The low-profile 31mm height is excellent for extra clearance if you want to upgrade from the AMD Wraith Stealth cooler to something more performant. The motherboard supports up to 64GB DDR4-5000, so there is plenty of headroom on the memory front.
Storage #
Boot Drive #
I got a TEAMGROUP MP33 256 GB M.2-2280 PCIe 3.0 X4 NVME SSD for the OS boot drive. Many folks make the OS drive redundant by using the remaining 2.5-inch bay, but this is strictly unnecessary as long as you take regular system configuration backups, which is an easy process . In a separate post, I will show how this can be automated.
Redundant Storage #
I have used 5 Seagate IronWolf NAS 6 TB 3.5" 5400 RPM Internal Hard Drive since the case supports 5 3.5-inch drives. Per my research, the 6TB drives were about 25% more expensive than the 4TB drives. The 8TB drives were about 49% more expensive than the 6TB ones. The 8TB drives were also faster at 7200 RPM. 5400 RPM was plenty since, with 5 disks, it easily translates into several 100s of MB/s of disk bandwidth. So budget-wise, the 6TB felt like a sweet spot between speed and storage. There is more than a one-size-fits-all answer here. You do you.
SFX Power Supply #
I went with Cooler Master V750 SFX Gold Full Modular, 750W, 80+ Gold Efficiency . You could likely use lesser - PCPartPicker should help find what would work and is available in stock.
Operating System #
There are many choices here, but I limited my search to two popular ones: Unraid & TrueNAS Scale. Unraid is more flexible with assorted disk sizes and expandability, but most posts I read suggested I go with TrueNAS Scale if I make a new setup with new disks. Unraid has excellent containerization support, and I’d like to know if I’d get the same ease with TrueNAS. I am happy to report that TrueNAS Scale has been a breeze with the TrueCharts repository , especially if you follow the videos posted on the YouTube channel . TrueChart’s online documentation needs to be improved, but their slack channel is active, and I have resolved all challenges by searching through past messages. If something you want isn’t available with TrueCharts, the fact that TrueNAS is running Kubernetes is beneficial.
RAIDZ Levels #
How much redundancy is enough?
RAIDZ0 #
RAIDZ0 is plain mirroring and needs an even number of disks. Also, it uses 50% of the storage for redundancy. This is an excellent option if you have precisely two disks.
RAIDZ1 #
RAIDZ1 allows for 1 disk to fail. In case of a failure, the system keeps running while rebuilding the failed disk on a replacement. Most folks advise against RAIDZ1 because disk failures are correlated, especially if you bought disks from the same batch (which is more likely if you’ve ordered 5X of the same disk from the same store). When such a disk fails, the probability of another failure is higher. With RAIDZ1, you hammer the system during the following rebuild, which can cascade into another disk failure. Two failed disks are a game-over scenario for RAIDZ1: you have lost all your data.
RAIDZ2 #
The suggested solution is RAIDZ2, which allows for 2 disks to fail. The tradeoff, obviously, is total available storage. You can use this nifty tool to calculate how much storage you would have available for this setup. If we plug in these numbers:
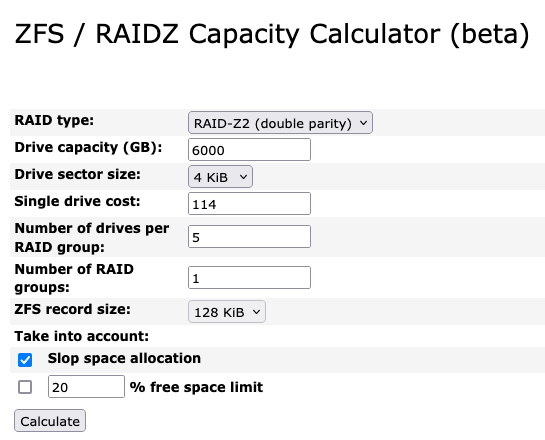
The calculator shows we get 17TB or 15TiB usable storage capacity. That’s about 57% of the total capacity, which is what you’d expect for 2 out of 5 disks (40%) holding redundancy information (plus some overhead). You could go to RAIDZ1 and get 35% more storage, but I was happy with 17TB and taking a safer route. For increasing storage, one option is to use the remaining 2.5-inch bay and 1 SATA port in the system. 2.5-inch disks are expensive, though! An added caveat is that in RAIDZ2, the usable storage provided by your setup is constrained by the smallest disk. The 2.5-inch disk would have to be at least 6TB. The pricing options in this direction are insane.
If I need more storage in the future, my only option is to upgrade all disks. Not all need to be upgraded at once, though. For example, I can buy one upgrade disk monthly for five months and upgrade as I go. Note: I will only get the benefits of the upgrade once the last disk is upgraded.
It will take me a reasonable amount of time to use up all 17TB. Thus, I’m not worried about the day I need to upgrade.
Finally #
That’s it for this post! It is a long one. In subsequent posts, I will go through some of the apps and services I explored.